Mobile-Terminated SMS Procedure
This section is applicable to the lab application and to a test application with the required feature license.
General Procedure
This section describes general procedures for Mobile-Terminated SMS tests.
- STEP A: Set Up the Mobile-Terminated SMS Parameters
- STEP B: Create/Edit the Mobile-Terminated Message Contents
-
STEP C: Send an SMS Message to the Mobile Station
- Method 1: Sending an SMS message while in idle state
- Method 2: Sending an SMS message via a temporary SO6 or SO14 connection.
-
Method 3: Sending an SMS message while in a voice or data call.
Standards specify that shorter messages are sent on the control channel and longer messages are sent on the traffic channel. The test set does not support changing the channel based on the message length and will truncate the message to be sent to the mobile station as necessary for the current configuration (see How Does the Test Set Build the Mobile-Terminated Message? ).NOTE
STEP A: Set Up the Mobile-Terminated SMS Parameters
- Press the Call Setup key.
-
Press the
More
key on the lower left side of the test set two times until
3 of 3of theCall Controlmenu is displayed. -
Press the
F5
(
Short Message Service), go to SMS Control menu. -
Press the
F2
(
Mobile-Term SMS Parameters). The Mobile-Terminated SMS Parameters menu appears.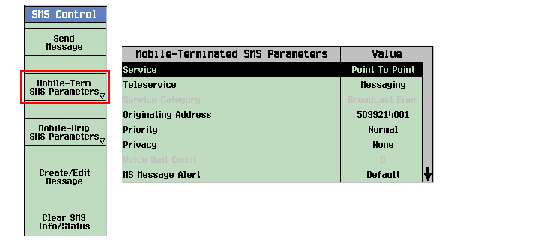
-
Set the parameters as desired. See
Setting Mobile-Terminated SMS Parameters
for the parameters description. For example, set the
ServicetoPoint To Pointfor point-to-point SMS tests, or set theServicetoBroadcastfor broadcast SMS tests. -
Press the
F6
(
Close Menu) to go back to the SMS Control menu. The parameters you've set in step 5 are displayed in the Mobile-Terminated SMS Info window. See Mobile-Terminated SMS Info for details.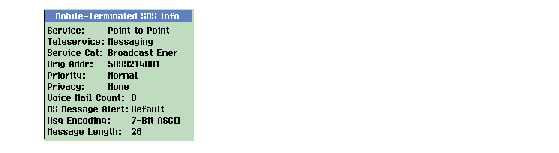
STEP B: Create/Edit the Mobile-Terminated Message Contents
-
Press the
F4
(
Create/Edit Message) on the SMS Control menu. The Create/Edit menu appears.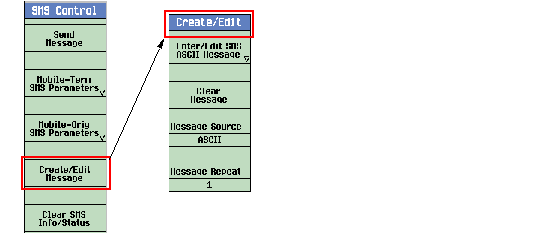
-
Press the
F3
(
Message Source). You can select eitherASCIIorHEXdata entry format. -
(Optional) Clear the message contents currently in the
Mobile-Terminated Message
window by pressing the
F2
(
Clear Message). -
Based on the setting of
Message Source( F3 ) in step 2, the F1 softkey is labeled as eitherEnter/Edit SMS ASCII MessageorEnter/Edit SMS Hex Message. Press the F1 , the Enter/Edit SMS Message menu for the selected message source appears.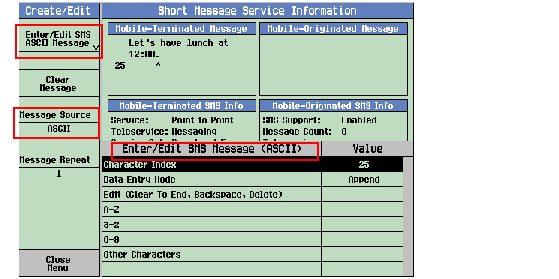
-
Enter/edit the message contents as desired. For more information about the editing commands, see
Enter/Edit Message Contents
. The contents you entered appear in the
Mobile-Terminated Message
window.
For example, you want to send a message to the mobile station with the contents of "Let's have lunch at 12:00." AssumingASCIIis selected in theMessage Source( F3 ).-
Turn the knob to highlight the
A-Zand then press the knob. Select theLand thenDoneby using the knob. -
Turn the knob to highlight the
a-zand then press the knob. Select thee,t,s,space,h,a,v,e,space,l,u,n,c,h,a,t,spaceDone by using the knob. -
Turn the knob to highlight the
0-9and then press the knob. Select the1,2,0,0,.(period) and thenDoneby using the knob. -
To insert the : (colon) between 2 and 0, turn and knob to highlight the
Character Indexand then press the knob. Turn the knob counterclockwise until the caret (^) is positioned at the 2 or current Character Index value is 20, then press the knob. Turn the knob to highlight theOther Charactersand then press the knob. Select the:(colon) and thenDoneby using the knob. -
To insert the ' (apostrophe) between t and s, turn and knob to highlight the
Character Indexand then press the knob. Turn the knob counterclockwise until the caret (^) is positioned at the character t or current Character Index value is 2, then press the knob. Turn the knob to highlight theOther Charactersand then press the knob. Select the ' (apostrophe) and thenDoneby using the knob. -
If you want to delete some characters due to wrong editing, highlight the
Edit Commandand then select Delete or Backspace command.
The "<--" and the numeric keys on the DATA ENTRY field of the test set's front panel have no effect on short message editing.NOTE
- Press the F6 (
Close Menu). Now, you've finished the message contents editing.- (Optional) If you want to send a long message, you can simply set the
Message Repeat( F4 ) to repeat the message contents you've entered. See Set Message Repeat for details. You will notice that theMessage Lengthin Mobile-Terminated SMS Info window varies with theMessage Repeat( F4 ) setting. The repeats of the message contents are not shown in Mobile-Terminated Message window.- Press the F6 (
Return) to go back to the SMS Control menu. Now, you are ready to send a short message to the mobile station.STEP C: Send an SMS Message to the Mobile Station
You can send a short message to the mobile station whether it is idle or engaged in a voice or data call. The test set provides three methods for your choice (see Sending an SMS Message to the Mobile Station for details):
Method 1: Sending an SMS message while in idle state
- If you would like log the protocol messages exchanged between the test set and the mobile station, set up the Wireless Protocol Advisor (WPA) and start logging. See Logging SMS Messages .
- Connect the mobile station to the test set.
-
Power on the mobile station and wait for the mobile station to perform a power up registration. The mobile station information should appear in the
Mobile Reported Information
window after a successful registration. Otherwise, perform the steps 1 through 9 in
How Do I Set Up an IS-2000 Call?
to have the mobile station registered. The current call status is Idle.

- Send an SMS message you've created in STEP B to the mobile station on the control channel, F-PCH or the F-CCCH being configured (see Control Channel Configuration ) while in Idle state.
-
The test set will wait for the acknowledgment from the mobile station. Observe the SMS Message Acknowledge Info window for the indications, see
SMS Message Acknowledge Info
for details.

- Observe the display on the mobile station to confirm that the message(s) were received.
- If you are capturing a log, stop logging.
Method 2: Sending an SMS message via a temporary SO6 or SO14 connection.
- If you would like log the protocol messages exchanged between the test set and the mobile station, set up the Wireless Protocol Advisor (WPA) and start logging. See Logging SMS Messages .
- Connect the mobile station to the test set.
- Power on the mobile station and wait for the mobile station to perform a power up registration. The mobile station information should appear in the Mobile Reported Information window after a successful registration. Otherwise, perform the steps 1 through 9 in How Do I Set Up an IS-2000 Call? to have the mobile station registered. The current Call status is Idle.
-
Set the service option for the current selected radio configurations to SO6 or SO14. See steps 6 and 7 in
How Do I Set Up an IS-2000 Call?
.

-
Send an SMS message you've created in STEP B by establishing a call in SO6 or SO14:
- Press the Call Setup key.
-
Press the
More
key on the lower left side of the test set two times until
3 of 3of theCall Controlmenu is displayed. -
Press the
F5
(
Short Message Service), go toSMS Controlmenu. -
Press the
More
key, go to
2 of 2of theSMS Controlmenu. -
Press the
F3
(
Originate Call).
-
Observe the state changes of the SMS Status in the
SMS Message Acknowledge Info
window and the call status in the Active Cell field. See
SMS Status Description
for details.
- State changes in Active Cell field: Idle -> Paging -> Access Probe -> Connected -> Idle
- State changes in SMS Status: Idle -> Paging -> Sending -> Waiting -> MS Ack
You will notice that the call is automatically terminated when the test set receives the acknowledgment from the mobile station or after the period of the ~15 seconds since the connection (see Mobile-Terminated Message Timeout ).NOTE

- Observe the display on the mobile station to confirm that the message(s) were received.
- If you are capturing a log, stop logging.
Method 3: Sending an SMS message while in a voice or data call.
- If you would like log the protocol messages exchanged between the test set and the mobile station, set up the Wireless Protocol Advisor (WPA) and start logging. See Logging SMS Messages .
- Connect the mobile station to the test set.
-
Establish a voice or data call (for example, SO3). Follow the procedure in
How Do I Set Up an IS-2000 Call?
. Make sure that the service option is set to any value
other than
SO6 and SO14. Verify that the call has established by checking for
Connectedin theActive Cellfield.
- Send an SMS message you've created in STEP B to the mobile station while in a call.
-
The test set will wait for the acknowledgment from the mobile station. Observe the SMS Message Acknowledge Info window for the indications, see
SMS Message Acknowledge Info
for details. The call remains connected unless you disconnect the call.

- Observe the display on the mobile station to confirm that the message(s) were received.
- If you are capturing a log, stop logging.
Performing CDG Stage 2 SMS Tests: 8.1 and 8.3 Tests
All of the tests as specified in the CDG Stage 2 8.1 Mobile Station Terminated SMS Tests and 8.3 Broadcast SMS Tests can follow the General Procedure . The special settings required for each test are listed in the Mobile-Terminated SMS Tests
Mobile-Terminated SMS Tests Specific Setting Required for the Test During the General Procedure
8.1 Mobile Station Terminated SMS Tests (for all 8.1x tests, set the
ServicetoPoint To Pointin STEP A, substep 5)In STEP C, use method 1 to send the short message to the mobile station.
8.1.2 SMS Delivery Procedures when Message Too Large for Paging Channel
In STEP C, use method 2 to send the short message to the mobile station.
The test set does not support changing the channel based on the message length. You need to force the test set to send the short message to the mobile station over the traffic channel.NOTE
In STEP C, use method 3 to send the short message to the mobile station.
In STEP C, use method 2 and 3 to send the short message to the mobile station.
The maximum length allowed is determined by many factors such as the protocol standards, the channel the message is sent on, message overhead, how many optional parameters are included, etc. If the desired message is truncated before being sent to the MS, the error message "SMS send message truncated due to protocol to <n> characters (where n is the maximum length allowed)" will be generated.NOTE
8.1.6 SMS Delivery Error - Mobile Station Short Message Buffer Full
Repeat the general procedure (with any method) to send a number of messages to the mobile station (typically 100 messages) until "35 Destination resource shortage" appears on the
MS Ack Cause Codeof the SMS Message Acknowledge Info window.-
set
ServicetoPoint To Point -
set
TeleservicetoVoice Mail -
set
Voice Mail Countto99(for test 1)
setVoice Mail Countto0(for test 2)
After the procedure, you should see that the number of the voice mail messages on the mobile station screen is what you've set for the tests.
You can perform the tests with the mobile station #1 which is configured to receive broadcast SMS first, then do the same tests on mobile station #2 which is not configured to receive broadcast SMS.
Verify that both mobile stations shall display broadcast message (Emergency). Mobile station #1 shall display broadcast message (Normal) but mobile station #2 does not. All received broadcast messages shall be correct and complete.
- Press the F6 (
-
Turn the knob to highlight the

